Are you experiencing problems with your water heater pilot light? Don’t worry; it’s a common issue that can easily be fixed.
A water heater pilot light is a small flame that ignites the burner to heat the water in your tank. If the pilot light goes out, your water heater will stop producing hot water, which can be inconvenient. Resetting the pilot light is a simple process that requires a few basic steps, but following safety precautions is essential. Additionally, understanding why your pilot light went out and how to troubleshoot the issue can help prevent future problems.
This guide on how to reset water heater pilot light will provide clear instructions to help you safely and effectively reset your water heater pilot light, restoring your hot water supply in no time.
What Are the Causes of a Pilot Light Going Out?
There are several potential causes for a pilot light to go out, including:
- A Strong Draft: A strong gust of wind or ventilation in the room where your water heater is located can cause the pilot light to extinguish.
- Dirty or Damaged Components: Dust and debris can build up on the thermocouple or burner assembly over time, affecting their functionality. Additionally, if these components become damaged or worn out, they may not be able to maintain the pilot light flame properly.
- Gas Supply Issues: If there is an issue with the gas supply to your water heater, such as low pressure or a gas leak, it can cause the pilot light to go out. It’s essential to regularly check your gas lines and have them inspected by a professional if you suspect any issues.
- Thermostat Malfunction: The thermostat is responsible for regulating the temperature of your water heater, including controlling the pilot light. If it malfunctions or becomes damaged, it may be unable to maintain the flame and keep the pilot light lit properly.
- Improper Ventilation: Adequate ventilation is crucial for a gas water heater. If there is not enough air flow in the room where your water heater is located, the pilot light can extinguish due to lack of oxygen.
What Will You Need?
To troubleshoot and fix a pilot light that won’t stay lit on your gas water heater, you will need the following tools:
- A screwdriver
- A flashlight
- A wire brush
- Replacement parts: thermocouple, thermopile (depending on the issue)
- Safety equipment: gloves and eye protection
Once you have gathered all the necessary tools and equipment, you can begin troubleshooting your gas water heater. It is important to note that if you feel uncomfortable or unsure at any point during the troubleshooting process, it is best to call a professional plumber for assistance.
8 Easy Steps on How to Reset Water Heater Pilot Light
Step 1: Turn Off the Gas Supply
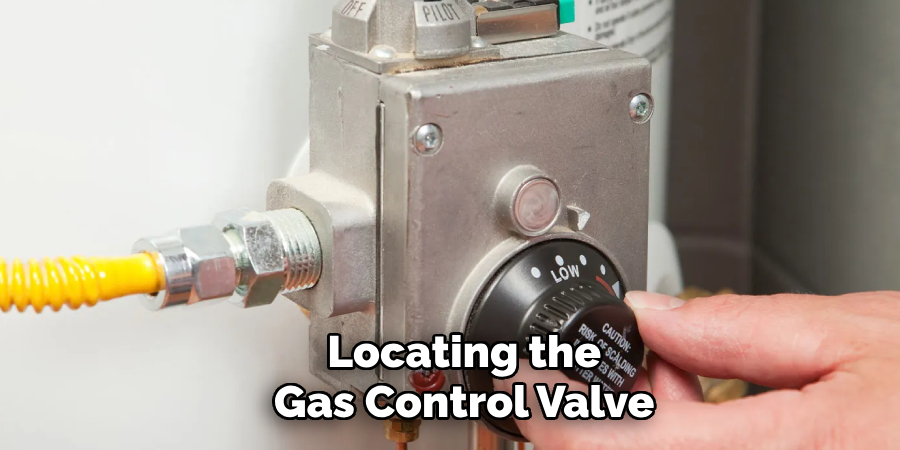
Begin by locating the gas control valve on your water heater. This valve is typically found near the bottom of the unit and is often marked with “On,” “Off,” and “Pilot” settings. Turn the knob to the “Off” position to completely stop the flow of gas to the water heater.
This step is critical for safety as it prevents accidental gas leaks while troubleshooting or resetting the pilot light. Wait at least five to ten minutes to allow any residual gas in the area to dissipate before proceeding with the next steps. This precaution reduces the risk of fire or explosion during the reset process. Always ensure proper ventilation in the area before continuing.
Step 2: Locate the Pilot Light Assembly
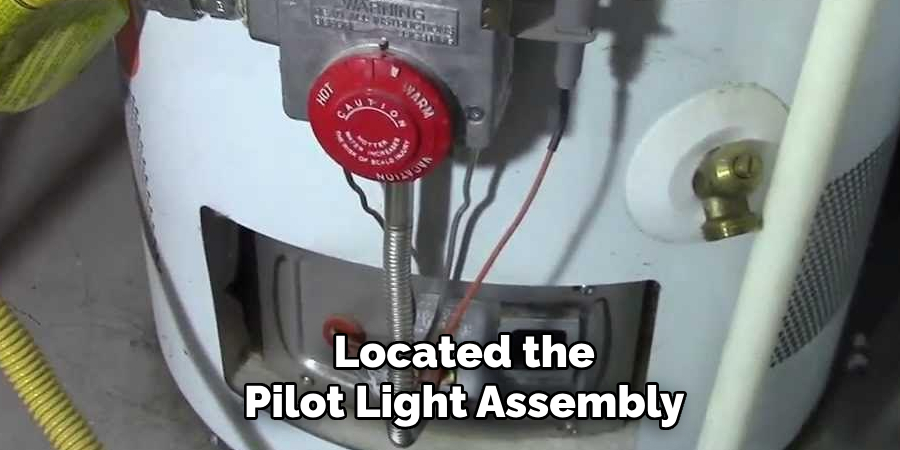
The pilot light assembly is typically located near the bottom of the water heater. It consists of a small burner and a gas control valve.
To find it, look for an access panel that either slides or lifts off, giving you visibility to the burner area. Once you’ve identified the assembly, take a moment to familiarize yourself with the components. The pilot light tube, thermocouple, and gas supply line should all be visible and accessible.
Scrutinize the area for any dirt, debris, or signs of damage, as these could impact the functionality of the pilot light. If there is any buildup, consider gently cleaning the area with a soft brush or a compressed air canister to ensure everything is clear and ready for resetting. Understanding the layout of the pilot light assembly is essential for safely proceeding with the reset.
Step 3: Turn the Gas Control Valve to the Pilot Setting
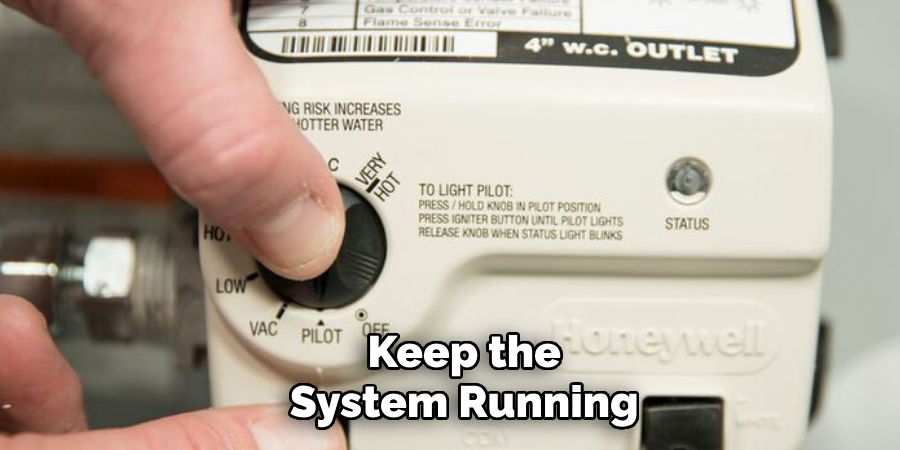
Once you have located the pilot light assembly, find the gas control valve. Turn the valve to the “Pilot” setting. This setting allows a small amount of gas to flow to the pilot light without igniting the burner. Typically, you must press and hold the valve in this position to keep the gas flowing while you reignite the pilot light. Hold the valve firmly and be cautious not to force it, as doing so may damage the mechanism.
Step 4: Ignite the Pilot Light
With the gas control valve in the “Pilot” setting, locate the igniter button or use a long lighter to ignite the pilot light. If your system has an igniter button, press it while continuing to hold the gas control valve in place. If using a lighter, carefully bring the flame near the pilot light assembly while holding the valve.
Once the pilot light ignites, hold the gas control valve for about 30 seconds to ensure the flame stays lit. Release the valve slowly and confirm that the pilot light remains on. If the light goes out, repeat the process until it stays lit.
Step 5: Reassemble and Test the System
After confirming that the pilot light is lit and stable, carefully reassemble any components you removed earlier. Ensure everything is secured correctly to avoid any issues.
Turn the gas control valve to the “On” position and test the system by adjusting the thermostat or activating the appliance. Monitor the operation to ensure it is functioning correctly and efficiently. If you detect any unusual noises or smells, shut off the system and consult a professional.
Step 6: Perform Routine Maintenance
To keep the system running efficiently and safely, schedule routine maintenance checks. Regularly inspect the appliance for dirt, debris, or wear and tear on components, particularly around the burner and venting system. Clean any visible dust or grime and replace worn parts if necessary. Ensuring proper maintenance will prolong the system’s lifespan and help prevent future issues.
Step 7: Monitor Energy Efficiency
Monitoring the energy efficiency of your system is crucial for reducing energy waste and lowering utility costs. Start by regularly checking your energy bills for any unusual spikes in usage, as this could indicate that the system is not operating efficiently. Ensure that thermostat settings are optimized for comfort without excessive energy consumption—consider using a programmable or smart thermostat to manage temperature settings more effectively throughout the day.
Additionally, inspect for drafts or leaks around windows and doors that could force the system to work harder, raising energy consumption. If you notice significant inefficiency despite adjustments, consult a professional to assess the system and make any necessary improvements or upgrades. Consistent attention to energy efficiency contributes to both environmental sustainability and long-term savings.
Step 8: Schedule Regular Professional Inspections
To keep the system running at peak performance, schedule regular inspections by a qualified professional. These inspections can identify potential issues early, before they become costly or disruptive.
A professional will also perform thorough cleaning, calibrations, and necessary adjustments to ensure the system remains efficient and reliable. Regular maintenance appointments are an essential part of long-term system care.
By following these steps, you can ensure that your HVAC system operates efficiently and reliably for years.
5 Things You Should Avoid
- Ignoring the Manufacturer’s Instructions: Always refer to the water heater’s user manual for proper guidance. Ignoring these instructions can lead to improper use, damaging the unit, or even creating safety risks.
- Attempting to Reset Without Shutting Off the Gas Supply: Ensure that the gas supply is turned off before resetting the pilot light. Failing to do so may lead to a dangerous gas leak or accidental ignition.
- Using Improper Tools or Techniques: Avoid using unauthorized or forceful methods to reset the pilot light. This can lead to equipment damage or void your water heater’s warranty.
- Skipping Ventilation Checks: Ensure the area around the water heater is correctly ventilated before resetting. Poor ventilation can cause gas buildup, which is hazardous.
- Ignoring Repeated Pilot Light Issues: If the pilot light repeatedly goes out, do not keep resetting it. This could indicate a more significant issue, such as a faulty thermocouple or gas valve, and requires professional inspection.

Conclusion
How to reset water heater pilot light can be a straightforward process, provided you follow the proper steps with caution.
Always prioritize safety by turning off the gas supply, ensuring the area is well-ventilated, and reading the manufacturer’s instructions before proceeding. Avoid common mistakes, such as skipping ventilation checks or repeatedly resetting a problematic pilot light, as these can lead to safety hazards or mask underlying issues. If you encounter persistent problems or feel uncertain, it’s best to consult a professional technician to inspect and resolve the issue.
Taking these precautions will help ensure your water heater operates efficiently and safely.

